Latest Entries »

Windows System Boot Time

Recently I’ve found myself having to check the last time a Windows server was rebooted. It’s easy enough to search through the Event Viewer and find evidence of the system starting, but its time consuming.

Instead I fire up a command prompt and run this command:

systeminfo | find /i “System Boot Time”

A few seconds after hitting enter and the time and date are revealed. Very handy indeed…..

Moving to Blogger…

When I started my blog on WordPress, I also set one up in blogger. I originally planned to just use them to see which was best, but ended up using WordPress.

I’ve slowly transisioned myself in the Google system and I feel its time to move my blog there to so I can use it with Google Analytics.

I’ll be keeping this here and will be updating comments etc, but new posts will be here: http://neildeadman.blogspot.com/

Thanks for reading and I hope you follow me there too šŸ™‚

Neil


Today I took part in a 10km race around Battersea park. I’ve been running on and off for a few years, but recently started running regularly with a friend. I convinced him to sign up for his first 10km race so together we did this.

It was 4.2 laps in the park, and I stayed with my friend for the first 3 and then raised my pace for the last one. I managed to do a time of 1hr 27s which isn’t too bad, but some way off my best.

Well done to my brother who also ran the race with us and broke his PB by 4 minutes to achieve a time of just over 50 minutes. WELL DONE!!

You can view the race details as recorded by my Garmin HRM by clicking the link below.

Sri Chinmoy Self Transcendence 10K by neildeadman at Garmin Connect – Details.

London Marathon 2011

Yesterday I went to watch the London Marathon for the first time. I hope to run it one day, but yesterday’s trip was to watch my brother take it on for his first time.

It was a very hot day and I didn’t envy the runners at all.

Well done to everyone who took part!

See my photos here: http://goo.gl/UFZRN

Iā€™ve just started looking into Microsoftā€™s Azure Cloud Service at work as an alternative to the Amazon Web Services (AWS) cloud that we currently use [at work]. I really like AWS and may well be using it for personal projects in the not so distant future. However, as we are developing using C# .NET we wanted to see if Azure would give us anything over AWS.

Iā€™ve only just started, but it seems that you need to create your own VM image and upload it to Azure. I already have VirtualBox installed, so I didnā€™t want to have to start using an alternative just for Azure.

Luckily, included with VirtualBox is the ā€˜VBoxManageā€™ command-line. This allows you to manage VirtualBox from the command-line (i.e. start, stop VMs) but it also has a very useful switch: clonehd

This switch creates a copy of the VirtualBox HDD file and allows the copy to be of a different format. In my case I need VHD. The complete command-line for this is:

VBoxManage clonehd <source .vdi> <destination .vhd> --format vhd

Youā€™ll then end up with a cloned HDD image file of your VM. This is also the correct method, by the way, of backing up a VM. If you just copy & paste the file youā€™ll end up in a GUID nightmare!

For more information about VBoxManage clonehd and other VBoxManage command-lines, see the VirtualBox Manual online here.

In my last post, I promised to look at SendRawEmail next. I got busy on other projects so this has taken longer than I originally anticipated it would.

Converting MailMessage into a MemoryStream

public static MemoryStream ConvertMailMessageToMemoryStream(MailMessage message)
{
	Assembly assembly = typeof(SmtpClient).Assembly;

	Type mailWriterType = assembly.GetType("System.Net.Mail.MailWriter");

	MemoryStream fileStream = new MemoryStream();

	ConstructorInfo mailWriterContructor = mailWriterType.GetConstructor(BindingFlags.Instance | BindingFlags.NonPublic, null, new[] { typeof(Stream) }, null);

	object mailWriter = mailWriterContructor.Invoke(new object[] { fileStream });

	MethodInfo sendMethod = typeof(MailMessage).GetMethod("Send", BindingFlags.Instance | BindingFlags.NonPublic);

	sendMethod.Invoke(message, BindingFlags.Instance | BindingFlags.NonPublic, null, new[] { mailWriter, true }, null);

	MethodInfo closeMethod = mailWriter.GetType().GetMethod("Close", BindingFlags.Instance | BindingFlags.NonPublic);

	closeMethod.Invoke(mailWriter, BindingFlags.Instance | BindingFlags.NonPublic, null, new object[] { }, null);

	return fileStream;
}

When we create a request for the SES service, we need to give it a MemoryStream object that contains our mail message. I created a MailMessage object for this, but in order to give this to SES I had to convert it to a MemoryStream. I found the guts of the method above online, and slightly modified it for my own use. Iā€™m not going to talk about it, but you can find it here.

SendRawEmail

public static Boolean SendRawEmail(String from, String to, String Subject, String text = null, String html = null, String replyTo = null, String returnPath = null)
{
	AlternateView plainView = AlternateView.CreateAlternateViewFromString(text, Encoding.UTF8, "text/plain");
	AlternateView htmlView = AlternateView.CreateAlternateViewFromString(html, Encoding.UTF8, "text/html");

	MailMessage mailMessage = new MailMessage();
	mailMessage.From = new MailAddress(from);

	List<String> toAddresses = to.Replace(", ", ",").Split(',').ToList();
	foreach (String toAddress in toAddresses)
	{
		mailMessage.To.Add(new MailAddress(toAddress));
	}

	//foreach (String ccAddress in ccAddresses)
	//{
	//    mailMessage.CC.Add(new MailAddress(ccAddress));
	//}

	//foreach (String bccAddress in bccAddresses)
	//{
	//    mailMessage.Bcc.Add(new MailAddress(bccAddress));
	//}

	mailMessage.Subject = Subject;
	mailMessage.SubjectEncoding = Encoding.UTF8;

	if (replyTo != null)
	{
		mailMessage.ReplyTo = new MailAddress(replyTo);
	}

	if (text != null)
	{
		mailMessage.AlternateViews.Add(plainView);
	}

	if (html != null)
	{
		mailMessage.AlternateViews.Add(htmlView);
	}

	RawMessage rawMessage = new RawMessage();

	using (MemoryStream memoryStream = ConvertMailMessageToMemoryStream(mailMessage))
	{
		rawMessage.WithData(memoryStream);
	}

	SendRawEmailRequest request = new SendRawEmailRequest();
	request.WithRawMessage(rawMessage);

	request.WithDestinations(toAddresses);
	request.WithSource(from);

	AmazonSimpleEmailService ses = AWSClientFactory.CreateAmazonSimpleEmailServiceClient(AppConfig["AWSAccessKey"], AppConfig["AWSSecretKey"]);

	try
	{
		SendRawEmailResponse response = ses.SendRawEmail(request);

		SendRawEmailResult result = response.SendRawEmailResult;

		Console.WriteLine("Email sent.");
		Console.WriteLine(String.Format("Message ID: {0}", result.MessageId));

		return true;
	}
	catch (Exception ex)
	{
		Console.WriteLine(ex.Message);

		return false;
	}
}

The above method uses the .NET MailMessage class to create my email message.

Lines 3/4 create our alternative email messages so the email should be visible in whatever mail app is used to retrieve the emails.

Lines 9-13 add the TO addresses to the mail message. Again, I pass in the emails as a string separated by a semi-colon and convert this to a list. The mail message wants each address added as a MailAddress object so a foreach loop steps through the list and adds each address correctly.

Lines 15-23 do the same for CC and BCC address if you wanted to use them. I havenā€™t in my example, but include the code commented out for you. Youā€™ll also need to add them so you can pass them in when calling the method (Line 1).

Line 25/26 sets the Subject and its encoding and then lines 28-41 add the Reply To address and our alternative views we created earlier (if the String isnā€™t null).

Line 43 creates our RawMessage object and then lines 45-48 call our method above to convert the MailMessage into a MemoryStream.

We create our request on line 50 and give it our RawMessage on line 51. We also give it our TO addresses and our FROM address on lines 53/54.

We connect to SES on line 56 and then get the response from giving SES our request on lines 60-62 and output to the console the Message ID and a confimation message on lines 64/65.

Other than converting the MailMessage to a MemoryStream this is pretty straight forward. Iā€™ll do my best to help anyone having issues via the commentsā€¦

Neil

Smile

Amazon have just released a beta of a new service called Amazon Simple Email Service (SES) that allows you to send out emails with saleability. Iā€™m not here to discuss the service itself, so you can read more information about it here. You can also view more information about the APIs here and sign-up for it here.

Whilst the service is in beta, you can only send emails to the email addresses that you have verified (Iā€™ll discuss how this is done later!) unless you request production access from Amazon.

Note: I created a AWS Console project in Visual Studio which is available to me because I have the AWSSDK.NET installed. During creation this asks for you AWS Keys and places them in the app.config file and is referenced in my code via AppConfig[ ] and

private static readonly NameValueCollection AppConfig = ConfigurationManager.AppSettings;

Listing Verified Email Address

This method will return a String List (List) of each email address that has been verified with Amazon. Iā€™m showing this method first as I use it later when verifying email addresses to prevent re-verifying an already verified email address.

public static void ListVerifiedEmailAddresses()
{
	List<String> verifiedEmailAddresses = GetVerifiedEmailAddresses();

	if (verifiedEmailAddresses.Count > 0)
	{
		Console.WriteLine("Verfied email addresses: \n");

		foreach (String verifiedEmailAddress in verifiedEmailAddresses)
		{
			Console.WriteLine("\t" + verifiedEmailAddress);
		}
	}
	else
	{
		Console.WriteLine("No email addresses have been verified.");
	}

	Console.WriteLine();
}

public static List<String> GetVerifiedEmailAddresses()
{
	AmazonSimpleEmailService ses = AWSClientFactory.CreateAmazonSimpleEmailServiceClient(AppConfig["AWSAccessKey"], AppConfig["AWSSecretKey"]);

	ListVerifiedEmailAddressesRequest request = new ListVerifiedEmailAddressesRequest();

	try
	{
		ListVerifiedEmailAddressesResponse response = ses.ListVerifiedEmailAddresses(request);

		ListVerifiedEmailAddressesResult result = response.ListVerifiedEmailAddressesResult;

		List<String> verifiedEmailAddresses = result.VerifiedEmailAddresses;

		return verifiedEmailAddresses;
	}
	catch (Exception ex)
	{
		Console.WriteLine(ex.Message);

		return new List<String>();
	}
}

The first method above, ListVerifiedEmailAddresses(), is just to output the results, if any, line by line to the console. The main work is done by the second method, GetVerifiedEmailAddresses() which returns the String List of verified email addresses.


Lines 24 to 26 create my client connection to SES fetching my AWS Keys from the app.config file as mentioned in my note above.

Lines 28/29 create a new ListVerifiedEmailAddressRequest request that we will use when talking to the SES service.

Lines 33/34 passes the request to the SES service and gets the response from the service as a ListVerifiedEmailAddressResponse. This response contains the result that we then get to via lines 36/37 and 39/40 before returning the String List.

These last few lines could be compacted down, but I have left them in this form to show how it all relates together and for tidier code on this blog.

Verify Email Address

Before you can send an email through SES, you must verify the email address the service will send the email from. When you talk to the service to verify an email address it will send an email to the address with a link that the recipient uses to verify the email address. Until this is done, the email address will not show in the Verified Email Address list the code above retrieves.

My method below includes some console output which I wonā€™t discuss in detail.

public static Boolean VerifyEmailAddress(String emailAddress)
{
	List<String> verifiedEmailAddresses = GetVerifiedEmailAddresses();

	if (!verifiedEmailAddresses.Contains(emailAddress))
	{
		AmazonSimpleEmailService ses = AWSClientFactory.CreateAmazonSimpleEmailServiceClient(AppConfig["AWSAccessKey"], AppConfig["AWSSecretKey"]);

		VerifyEmailAddressRequest request = new VerifyEmailAddressRequest();

		request.WithEmailAddress(emailAddress);

		try
		{
			VerifyEmailAddressResponse response
			= ses.VerifyEmailAddress(request);

			Console.WriteLine("An email has been sent for verification.");
			Console.WriteLine("Click link in email to verify");
			Console.WriteLine();
			Console.WriteLine(String.Format("Request ID: {0}", response.ResponseMetadata.RequestId));

			return true;
		}
		catch (Exception ex)
		{
			Console.WriteLine(ex.Message);

			return false;
		}
	}

	Console.WriteLine("Email address already verified.");

   return true;
}

As I mentioned earlier, I use the GetVerifiedEmailAddresses() method that I discussed in the previous section of this blog to get a list of currently verified email addresses (Lines 3/4). On line 6 I then check to see if the list contains the email address I am trying to verify now. If it does, we donā€™t need to re-verify it. I havenā€™t done any checks for case-sensitive email addresses, but Iā€™m sure you could easily add this!


If itā€™s not in the list of verified email addresses, then I get a connection to the SES service again with lines 8-10. Lines 12-15 build my request to verify an email address. Line 15 being where we actually specify the email address we are verifying in the request.

Lines 19/20 then communicate with the SES service and get back a response. This response only contains a Request ID. If this was successful then an email will have been sent to the email address specified with a link to verify the email address with Amazon.

If the email address was already in the list then we output a relevant message to the console and return from the method.

Once you have clicked this link and the email address has been verified with Amazon, then the address will appear in the List Verified Email Address methods above.

Sending Email

Now that we have a verified email address, we can start to use the service. As I mentioned above, unless you request otherwise, Amazon will only allow you to send emails to the verified email addresses.

public static Boolean SendEmail(String From, String To, String Subject, String Text = null, String HTML = null, String emailReplyTo = null, String returnPath = null)
{
	if (Text != null && HTML != null)
	{
		String from = From;

		List<String> to
			= To
			.Replace(", ", ",")
			.Split(',')
			.ToList();

		Destination destination = new Destination();
		destination.WithToAddresses(to);
		//destination.WithCcAddresses(cc);
		//destination.WithBccAddresses(bcc);

		Content subject = new Content();
		subject.WithCharset("UTF-8");
		subject.WithData(Subject);

		Content html = new Content();
		html.WithCharset("UTF-8");
		html.WithData(HTML);

		Content text = new Content();
		text.WithCharset("UTF-8");
		text.WithData(Text);

		Body body = new Body();
		body.WithHtml(html);
		body.WithText(text);

		Message message = new Message();
		message.WithBody(body);
		message.WithSubject(subject);

		AmazonSimpleEmailService ses = AWSClientFactory.CreateAmazonSimpleEmailServiceClient(AppConfig["AWSAccessKey"], AppConfig["AWSSecretKey"]);

		SendEmailRequest request = new SendEmailRequest();
		request.WithDestination(destination);
		request.WithMessage(message);
		request.WithSource(from);

		if (emailReplyTo != null)
		{
			List<String> replyto
				= emailReplyTo
				.Replace(", ", ",")
				.Split(',')
				.ToList();

			request.WithReplyToAddresses(replyto);
		}

		if (returnPath != null)
		{
			request.WithReturnPath(returnPath);
		}

		try
		{
			SendEmailResponse response = ses.SendEmail(request);

			SendEmailResult result = response.SendEmailResult;

			Console.WriteLine("Email sent.");
			Console.WriteLine(String.Format("Message ID: {0}",
				result.MessageId));

			return true;
		}
		catch (Exception ex)
		{
			Console.WriteLine(ex.Message);

			return false;
		}
	}

	Console.WriteLine("Specify Text and/or HTML for the email body!");

	return false;
}

This method is the longest of the lot. Mainly because of the way that the email request is constructed. This method along with the others contains sloppy coding, but is just for example purposes so Iā€™ll let this pass Winking smile


Iā€™ve included some default values in my method some of which are not required to send an email. HTML & Text are required, but at least only one of them is. This is why I gave them defaults so I can check if either has been specified and give back an error message if they arenā€™t. This is done on lines 5/6.

For To and ReplyTo I use a input type of String, but in my method I convert them to String Lists separating the email address with at the ā€˜;ā€™ character. So a list of emails to send to would be passed to the method like ā€œemail@domain.com; email2@domain2.co.ukā€ etc. This is done on lines 9-13 and 48-52.

First we create a Destination giving it the To addresses on lines 15/16. You can also include any CC or BCC addresss here. I have commented out the code on lines 17/18 where this can be done as I am not using them in the example.

Now we need to create Content for the email itself. We create a Content for Subject (lines 20-22), and the two body types (Text and HTML ā€“ lines 24-26 and 28-30) specifying a Character Set of UTF-8 for each. We then create a Body and pass in the Text and/or HTML (both in my example) on lines 32-34.

Then we create a Message which we give our Body and subject Content to on lines 36-38.

Now we have constructed out Destination and Message we can communicate with the service to get the email sent.

As before we connect to the service with lines 40-42 and then create a SendEmailRequest request that we provide with our Destination, Message and out From email address, which is all done on lines 44-47.

If we have provided the optional ReplyTo email address (where replies to the email will be delivered) and the ReturnPath email address (where bounce backs will arrive) we also add these to our service request.

We then pass this request to the service and get back its response on line 67.

From this response we get the result (line 69) which contains a Message ID which we output to the console on lines 71-73 along with an email sent message.

If you check your email you should see it has been delivered!

In my next post I will go through examples of:

  • Deleting Verified Email Addresses
  • Sending Raw Email

Hope this helps people starting to look at this service. If demand is there I can supply the project code. Let me know in comments below!

Neil

UPDATE: Something I forgot to mention during my original post was that the ReplyTo and ReturnPath email addresses need to be verified also.

UPDATE 2: The latest AWS SDK for .NET seems to depricate the method I used to connect to AWS. Change it to:


AmazonSimpleEmailService ses = new AmazonSimpleEmailServiceClient(awsAccessKeyId, awsSecretAccessKey);

So here it isā€¦ my first Android application release!

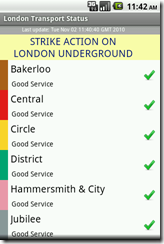
There are loads of apps that give you status of London Underground, but I never felt that they looked good enough. So having tried most of them (and paid for many too) I decided to release my own app: London Transport Status.

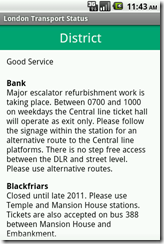
The app is quite simple. It gives you feed back regarding the status of each Underground and Overground lines and each line is clickable to take you to a more detailed status for that line.

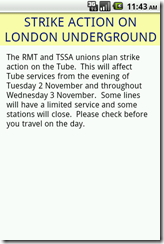
It will also show you information about Strikes and stations affected too.

The released version is 0.8.0 as I wanted to get a rough idea of any issues that may arise because of my inability to test on a wide range of devices. For this reason I consider this release very much a BETA release, so try not to score the app to badly until I have had the time to update it!

I plan on adding features, so if there is anything youā€™d like to see, add a comment below!

Screenshots (from Emulator):

mainlinebanner

Download:

AppBrain | Market

Since I got my iPhone 3G back in 2008, Iā€™ve wanted to start writing applications for mobile devices. The only restriction was that Apple charged a considerable amount to publish apps in the iTunes Store and Iā€™d need a Mac as at the time, iPhone apps were only able to be written in Objective-C.

I gave up on iPhone when HTC released their Desire device and Iā€™ve never looked back (well maybe the occasional glanceā€¦ iPhone hardware is still pretty attractive!).

So once again I wanted to develop apps, and thanks to the ability to use any computer, I jumped in.

I donā€™t find development as easy without Visual Studio as I have come to rely on it, but Iā€™m slowly getting used to Eclipse.

Iā€™ll post the odd code snippet here, but I will also be announcing my released apps here too!

Give them a try and give me feedback as I am only able to test on the Emulator and my HTC Desire at present!

Open-mouthed smile

I make no secret of the fact that I am a gadget lover. Ā In my time I’ve owned various mobile phones, games consoles, TVs, etc. and allĀ mannerĀ ofĀ peripheralsĀ for my computers.

I’m not a slave to Apple, Google, Microsoft or any other company for that matter (I was once a huge Sony fan, but I’m growing out of that!), so when it comes to choosing a new gadget, Ā I buy what best suits my needs. Not to fit in with society!

For example, when I was looking to buy my first MP3 player, I wanted a device that would play any file I threw at it. At the time, I had ripped all my CDs to my PC using Windows Media Player so they were all in WMA format. A friend had a nice player that had a huge capacity, and would play most audio file formats. The problems with his device were the physical size and the price. Eventually I bought a 2nd Generation iPod Nano, and whilst I have found many faults with iPods (such as it groups music by Artist and not Album Artist or both!), I believe it was the correct purchase. I now have a 160GB iPod Classic that carries all my music. I had to re-convert most of it, but that was a small price to pay.

Why am I telling you all this? Well, I watched the news last Friday when the iPad was released in the UK (28th MayĀ 2010), and I struggle to understand why someone would queue all night just to be the first person to buy this device. I’ve played with one (we have one at work) and I’d quite like one, but not for the stupid amount of money Apple are asking, for even their most basic model. I even heard a report that a 17 year old boy who was at the front of the queue, refused Ā£500 to give his place up to someone else. For that he could have got a much better model or even ordered one with that money and kept what he’d saved for other things. Add to that that someone was so desperate to be the first to buy an iPad they’d pay Ā£500 extra! Crazy! I just don’t get what makes people act this way!

Today, I then discovered this post on iphonealley.com. I read through this post – which discusses areas Android do wrong compared to iPhone – and found myself shacking my head at almost every point that was raised.

The author talks about AndroidĀ experiences/reviews and says that practically everyone reacts the same – “It’s nice, but something is just not quite right.”. This actually makes no sense. What you’ve got here is people who are familiar with the way the iPhone works! If someone who had never used an iPhone before was given one of the latest Android 2.1 devices (I can agree that before this Android was bad!), they wouldn’t react the same way. They may even say this about the iPhone when seeing one for the first time afterwards.Ā This doesn’t mean that the iPhone is or isn’t better!

The author went on to complain about the lack of the “screen bounce” feature (or similar) on Android devices that can be found on the iPhone. What a joke! Its a nice extra, but hardly a point to compare the OSes on! He goes on to say that some developers have used this ability in clever ways (i.e. to refresh the screen contents) which I agree is brilliant! Now this I’d like to have on Android!

Next the author moves on to physical buttons. Towards the end of this section he discussed the requirement for a trackball on Android devices which does the same as the touch screen. I don’t use mine, and I wish it didn’t have it. However, I neverĀ accidentallyĀ use it. I believe its inclusion is there to interest Blackberry users. Before this though, he talks about the “menu” button on Android. Personally, I think this is the correct way to do it and again I never knock it accidentally. I never struggled to use it this way, in fact it felt more natural to me. Of the 7 buttons on my HTC Desire, I’d keep the Volume Up/Down buttons, the Menu button, the Search button, the Home button and obviously the Power button. This means I’d lose the Back button and the trackball. One nice thing that iPhone does here is allow you to activate the phone via any button, unlike Androids use of only the power button.

Here are a couple of points I agree with the author on. Firstly the OS and UI. The fact that you can only buy two iPhones right now (3G or 3GS) is a bonus because the OS runs on them all. With Android, each phone may not support the latest OS release, but Google are working on this. The UI is another thing altogether. I like some features of HTC’s Sense UI, but I wish I could choose which bits I keep and which I returned to the default for the OS. This is one reason I’ll be running a custom OS! Finally, MultiTouch. Yes, not all Android phones have it, and on those that do, it doesn’t work as well as the iPhones implementation. Again though, Google are working on it, but it should have been better a few releases back!

Now we move on to one of the main benefits of keeping with Apple for all mobile devices… iTunes. Its not a great piece of software. Its not a great media player. The iTunes store is what makes this so good. I now buy most of my music from here, choosing only to buy my most favourite artists on CD still. To listen to my music, I won’t be using my Android device. I have an iPod for that. I will be using it for video that I convert from various sources. This is a pain to do with iTunes. I convert using Handbrake, but then to put them on my iPhone I need to import them in to iTunes and then enter the information about them so they appear correctly. There may be other better solutions, but to put them on my Android, I just drag and drop, then watch and delete. Job done!

If I wanted to put music on my Android there are several software solutions that allow me to do so with iTunes (kind of) like this one.

Finally, he moves on to what he calls iEnvy. Unfortunately, this really exists, but its not about owning an Apple device or having an Apple logo on it. It’s to do with the perceived superiority of the Apple devices.Ā Its no secret that Apple’s hardware is amongst the best looking hardware out there but they are overpriced.

I will be looking at the new iPhone to see what it brings to the table, as I will be looking at future Android devices. Neither is perfect. Both have their floors. I just wish people would give a true account of what they like/dislike rather than being biased towards a single companies products!

Neil